Subscribe to Blog
Email Address
 
Search for chip thinning returned 15 results.
Pages:(2) [1] 2

HSMAdvisor Workflow Overview

April 25, 2021, 10:59 pm by Eldar Gerfanov (Admin)

As a software developer, I am always looking for quality feedback on my software and ideas.
Sometimes it is useless like "speeds and feeds are wrong" or "my cutters are breaking" without explaining what they think is wrong. 
However, the feedback is often thorough and helps propel HSMAdvisor development by miles ahead in a very short time frame.

Here is the HSMAdvisor workflow step-though by our user Jake. He posted on the support forums as an answer to another user's question. And I thought it was so good, I asked his permission to post it on the HSMAdvisor website Help section:

I've been using HMSA for about 3 years now (maybe more) and have running it down to a pretty quick science.

If I need to create a new tool I do the following:

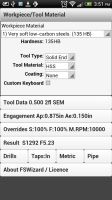
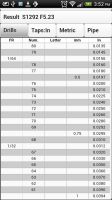
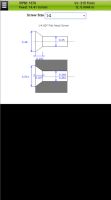
Press reset, select tool type and fill in all parameters as accurately as possible. I click the DOC and WOC labels to set them back to default then I press the "Add Tool" button. This will bring the naming/inventory box up. I only ever fill in the the "Comment" field as this is what the tool database uses to search for tools. Once this is done I click the save button. I use multiple databases (Flat End Mills, Radius End Mills, Jobber Drills, etc) to keep thing a little more organized in my head, however this is absolutely NOT necessary...you can have 1 giant library if you want. I never delete a tool once it is defined. This makes it SUPER fast to toss a tool into a holder and get some quick feeds/speeds by just searching for the tool. It also allows me to go back and search for a tool that I have used in the past. If it is in my HSMA library, it is most likely in one of the many places tools end up hiding in my shop.

If you have the tool saved it is as simple as pressing the "Load Tool/Cut" button. Once your tool database has popped up you can simply start typing and it will find any tools with a "Comment" that matches what you have entered. It's really fast and works really well once you get used to the steps...I can type in "3/8" and get every 3/8 endmill I've ever run to come up on the screen. To make this easier on myself I always include the decimal size as well (I run quite a few regrinds) so I can type in "0.3425" and it will bring up that particular end mill instantly.

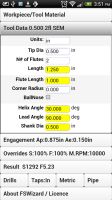
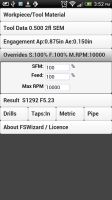
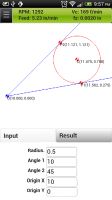
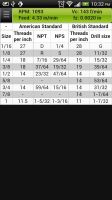
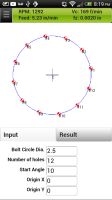
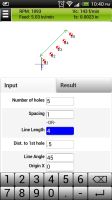
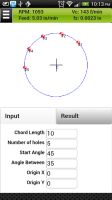
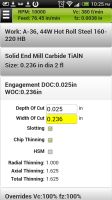
Now that your tool is defined and saved you are ready to get some cutting data. If you pick the materials list drop-down you are able to type your material in to do a quick search. I work with 6061, 7075, A2, D2, some CPM, and some plastics. All of them have come up without fail by just starting to type the material designation into the drop-down bar. Once your material is selected you can start entering cutting parameters. I pretty much always enter a DOC and then click the label for WOC to get the recommended width for the depth I am taking. I can then take this WOC value and tweak it until I max out my MRR using a combination of HSM and Chip Thinning. If I need to helix into a pocket I bring up the Circle/Ramp calculator. It is rather self-explanatory, however, you need to make sure you enter your ramp angle every time. It doesn't save a default and can give you a wonky plunge rate if you aren't careful to get the right data entered. If your pocket is going to be larger than 2xD of your tool I just enter the diameter that it will cut during the ramp. Something like 195% of the tool diameter so as to not leave a nub in the center. I also lock the spindle speed and plunge spindle speed so they are the same. I used to use different speeds for them however my machine has a gearbox that doesn't shift from low to high reliably while running a program.

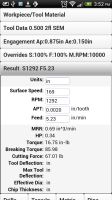
Next, I verify all the green/red bars are in the "safe zones." I leave the deflection/torque sliders at the default of 70%. With long end-mills, I tend to back down the deflection limit and lower the speed slider significantly.

Finally, I can take the calculated values from the top right box and enter them into Mastercam. I tried to set up the integration between HSM and MCAM years ago but it kinda shoehorned the functionality of HSMA from my standpoint. I use 2 monitors and leave HSM on one and MCAM on the other so I can bounce back and forth. If you only have 1 monitor there is a button for a "Floating Feed/Speed" window that will stay on top of MCAM and allow you to get the data moved without tons of switching programs on a single screen.

So that's the basic workflow I use for HSMA and MasterCam. It is not a perfect system but it is really quick. I can grab a tool I have defined in the past, select material, type in DOC, and have workable numbers to start from. It takes about 10 seconds....this program works exactly like my brain does.... it's almost weird how natural it feels.

Sorry if this is an overwhelming post on a necro thread, it is so much harder to explain how to use the software than it is to just....use the software. lol.

Jake

Best High Speed Machining is Dry Machining

May 18, 2016, 9:06 pm by Eldar Gerfanov (Admin)
14636193009621.jpg

Have you ever wondered how much tool life can deteriorate when using coolant with High-Speed Machining (HSM)?
Or maybe you never really saw the boost in tool life when using HSM techniques because you had to use coolant?

Well, here is a test result I just got from running the same tool at the same Speed and Feed with and without coolant.

Read More 

Perfect Ballnose Engraving Speeds and Feeds in Production Environment

December 6, 2015, 12:38 am by Eldar Gerfanov (Admin)
ballnoses_stepover.png

I regularly follow practicalmachinist.com forums.
Especially the cnc machining section of it.

I notice when CNC Speeds and Feeds questions come up people often suggest my HSMAdvisor Machinist calculator.
A referral by a satisfied customer is the best referral in my opinion. Thank you to everyone doing this great favor to me and my prospective users!

Other times users of HSMAdvisor question speeds and feeds it generates and instead of going to me, they ask on forums.
Which is always fine, because extremely often "wrong" results mean something wrong in users expectations or the data he feeds the calculator

In the process of discussion it usually turns out that the calculation results were correct, but because user decided to use a depth of cut or tool length, larger than he should have, HSMAdvisor compensates and gives a very conservative feed rate.

Just like in this forum post over here: Engraving with a 1/32 ball mill machinist wanted

Read More 

Key factors Determining Success of High Speed Machining (HSM)

September 12, 2015, 7:29 pm by Eldar Gerfanov (Admin)

As a developer of a very successful line of speed and feed calculators I sometimes get questions like : "I calculated speeds and feeds for a conventional toolpath. Got 5.5 cubic inches MRR(Material Removal Rate). And then I calculated S&F for the same endmill with HSM parameters turned on and got almost the same amount of  MRR! What is even the point in using HSM parameters?" -they ask.

I would like to clear some things up for my friends.
In this article I will explain exactly WHY HSM machining is better and HOW to achieve better productivity and tool life.

For starters here are the main features of a HSM-capable cutter:

As usual there are several components of HSM that need to be present in order for it to work to its fullest. These are:

a) Machine
b) Tool
c) Workpiece geometry
d) Workpiece material

I intentionally did not number these as each one of those is equally important.

Read More 

A new Help article on HSM

September 2, 2015, 10:23 pm by Eldar Gerfanov (Admin)

I often get email questions asking for clarification on merits of use of HSM And Chip Thinning check boxes when calculating speeds and feeds with HSMAdvisor and FSWizard calculators.

In this new help article will try to explain just what HSM means and in which situation you should use it:

http://hsmadvisor.com/index.php?page=help&shell_id=241&article_id=4574

Hopefully this will fill in the gaps and help our users to get more comfortable with our software.

Regards!

I've got mail

January 10, 2015, 12:26 pm by Eldar Gerfanov (Admin)

Most of email correspondence i receive is questions regarding use of my software, feature suggestions, material requests etc. Purely technical.

But sometimes i receive thank-you letters that make me feel all fuzzy and warm inside. It is a great feeling to know that something you do makes other people's work easier and more productive.

Yesterday I received a letter from one of HSMAdvisor's early users. He actually sent me a couple of short videos with a part he is currently making.

With his permission i am posting his letter:

Quote:
Your calculator is great… after a few years of using it, I am 100% confident in it. Great job!

http://instagram.com/p/xovWZJisss/

http://instagram.com/p/xkJ802Csvw/

I have used the software daily for probably close to two years now... Anything from aluminum to 17-4 to A2 Rc65 and any tool I throw at it, in any length. The numbers that your calculator give have never failed. The HSM and chip thinning functions have elevated my milling capabilities without question. Hands down the best money I have ever spent on a manufacturing tool. Thank you!

Craig W. Hargrave
All Out Mfg

Thank you Craig,

Over more than last two years you and many others have supported me with very valuable feedback and suggestions. Without all of you, it would have never come as far as it did.

And there is a lot more to come!

Latest updates to FSWizard:mobile Speed and Feed calc

July 28, 2014, 9:32 pm by Eldar Gerfanov (Admin)

I have recently published an update for both Android and Iphone versions.

Mainly i have fixed radial chip thinning for ballnose endmills.

I also added Axial, Radial and Compound Chip Thinning factors display in both cut depth/width panel, as well as Result panel.

So now you can see how parameters, you are entering, are affecting your thinning factors.

Observe the attached screenshots and download the update it you have not already!

Cheers!

Cut Panel 2014-07-28_22-25-16.png Result Panel 2014-07-28_22-26-01.png

HEM - High Efficiency Milling - Like your HSM but without crazy feedrates

October 24, 2013, 12:03 am by Eldar Gerfanov (Admin)

HEM is a relatively new term.

It means High Efficiency Milling. It only became available when constant tool engagement toolpahs became almost standard on most of the CAM software.

Unlike HSM that utilizes chip thinning effect, HEM relies on much larger widths of cut and thus chip thinning does not occur. What gives it its name is much higher material removal rate that would normally be possible.

When you are machining a pocket you are most often only milling at about 50% WOC. But nevertheless you need to calculate speeds and feeds based on the fact that the very first move and every corner will be full slotting action. Which means that the whole pocket needs to be machined at lower feedrate.

HEM uses constant engagement toolpths to make sure that this never happens and that Width of Cut remains optimal. Tool never needs to make a full slot so you can ramp up the feedrate as if you were doing outside profiling.

Here is a video of a 1/2" 3 flute endmill machining a 5/8" deep pocket in aluminum at full depth. Normally this pocket would have been machined in 2 steps at 150 inches per minute.

Using Constant Tool Engagement toolpaths we can go full depth at 0.175" stepover and 275 inches per minute.

The advantage of this method is obvious- Higher Productivity.

HEM is not ideal for all cases and each application merits its own method of machining, but its always nice to know more than one way to do your job.


Ways in which High Speed Machining (HSM ) works

October 12, 2013, 11:32 am by Eldar Gerfanov (Admin)

Lately there have been a lot of really interesting HSM topics on PracticalMachinist forums.

In one of them a guy who owns his own resharpening business posted a video of his endmill milling a block of D2 hardened to over 60 RC.
The forum topic is located here First try on D2 62Rc(video)

Here is his post so you know what we are talking about:

Quote:
In an effort to perfect our speeds and feeds while hardmilling, this is the first try. Its not right yet, but far from a failure. I apologize for the language at the end, but I do not edit my videos. The endmill was a reground garr VRX at .353 diameter. Parameters were 750 sfm, .018 radial, .300 axial and .004 ipt.
The next run will be at 650 sfm, .006 ipt using a mist sprayer. Also, any small areas will be blocked off to be ran at lower speeds to allow cooling time for the cutter. Just a note for anyone using a Mag Fadal, The E-stop button is not quick enough, use feed hold. The endmill was badly worn on the corners, but not broken, and will be resharpened and used again.

In the ensuing discussion i posted my own take on how and why HSM works

Quote:
HSM works in many ways.

1) Reduced cutting time per edge per revolution allows it to cool down more.
2) Chip thinning allows to increase chipload (advancement per tooth per revolution)
3) Increased depth of cut combined with shallow radial positively affects deflection. Tool bends less as it is more rigid towards the tool holder.
4) Higher cutting speed actually reduces cutting forces as heat generated in the cutting zone makes it easier to shear off a layer of metal. Yet because the time of contact is so small, most of the heat is carried away with the chip.
5) Higher RPM also allows to get rid of hot chips faster thus further reducing heat transferred to the tool.
6) Higher feedrate actually reduces relative cutting speed.
7) At high axial engagements more than one flute is in contact with the workpiece at different points along the axis of the tool. This too helps combat vibrations and chatter.
8) You are using more of the tool than just its tip, so technically you can do more work with one tool before it gets dull.
9) lastly it looks cool as hell and is very impressive. Whenever we know visitors or bosses are coming we try to make sure some HSM is going on 
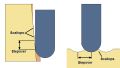
even if application does not merit that
I am not sure if the air that is moved by the endmill is doing much, but i suspect he didn't mean exactly that.


FSWizard is now available on iOS and Android

July 6, 2013, 11:08 pm by Eldar Gerfanov (Admin)

The best online cnc speed and feed calculator FSWizard is now available as an app for iPhone and Android.

CNC Milling and Turning Speed and Feed Calculator For Machinists on the palm of your hand!

Go To FSWizard Online Calculator

Note: Certain HSMAdvisor Licenses Include FSWizard PRO For Android for Free!!
Check out our HSMAdvisor Web Store for Details

Absolutely the best handheld CNC machinist's speed and feed calculator around.
Calculate cutting conditions simply by choosing your work and tool material.
No need to know any numbers. 
FSWizard will automatically use recommended cutting speed and chipload.

* Made by a machinist for machinists * 

Improve productivity and optimize cutter life.

* Milling, Drilling, Tapping and Turning
* Suggests optimum cutting depth and balances cutting parameters.
* Supports Chip thinning and HSM machining.
* Required Power estimation, Recommended Depth/Width of Cut for extra-long cutters.
* Built in tap drill calculator to calculate not only cutting speed and feed , but also drill dia in accordance with desired thread engagement.
* Drill and Tap charts for both imperial and metric systems.
* Oblique Triangle Calculator
* Fillet Calculator will find tangent points to a circle and two lines
* Machinists Bolt Hole Circle and Line Calculators

It just does it all.

*Milling Tools: Solid EndMill, Indexed End Mill and FaceMill, Solid and Indexable drills
*Drilling Tools: Jobber Drill, Hi-Performance Parabolic Drill, Spade Drill, Reamer
*Turning Tools: Profiling and Grooving

Please try the Free FSWizard Lite first to confirm your device capability.
Also huge thanks to those who go through the trouble and leave a review.
Good reviews mean more sales and more incentive for me to further improve on this app.

FSWizard Lite and FSWizard PRO are iPhone/Android machinist calculators that do not require internet connection.
PRO version has all the latest material lists and speed and feed technology.

Lite version has all the same features, but it only has tool steel, mild steel and aluminum in its material list. It still has all the tool types and tool materials found in online and standalone versions
Both Lite and Pro  versions have unlocked tapping data.

Lite versions have limited geometry calculators.

This app is intended not to replace but to complement my much more powerful standalone Windows application called HSMAdvisor.

FSWizard LITE

Free

Get it on Google Play

FSWizard PRO $49.99

Get it on Google Play

FSWizard PRO $39.99

Multiplatform License

for iOS and Android

Purchase through PayPal

2013-07-06_15-51-40.png 2013-07-06_15-51-40.png 2013-07-06_15-51-50.png 2013-07-06_15-51-50.png 2013-07-06_15-52-04.png 2013-07-06_15-52-04.png 2013-07-06_16-03-27.png 2013-07-06_16-03-27.png 2013-07-06_15-52-51.png 2013-07-06_15-52-51.png 2013-07-06_15-52-27.png 2013-07-06_15-52-27.png Fillet Calculator 2013-10-08_21-57-55.png Oblique Triangle Calculator 2013-08-18_22-11-18.png Pipe Taps 2013-08-20_22-32-00.png New Layout 2013-08-18_22-10-12.png Bolt Hole calc 2013-11-05_20-19-24.png Bolt Hole Line Calculator 2014-03-16_22-40-13.png Bolt Hole Particial Calculator 2014-02-09_22-13-27.png SHCS Reference FSWSHCS.PNG 82Deg FHS Reference FSW82degFHS.PNG
Pages:(2) [1] 2
Sing In

© 2009-2022 Eldar Gerfanov. All Rights Reserved.
© 2009 Eldar Gerfanov. Materials on this site are presented as is and are mostly for educational use.

You may freely reproduce information presented herein without any consent from me, provided you include link to this site.
In case when i am not the copyright holder, you may want to contact proper owner of material. Anyway, they are freely available on the Internet.
If you hold the copyright right for any of the materials on this site and want them removed, please contact me here